
Summary and Schedule
The best way to learn how to program is to do something useful, so this introduction to Python is built around a common scientific task: data analysis.
Scenario: A Miracle Arthritis Inflammation Cure
Our imaginary colleague “Dr. Maverick” has invented a new miracle drug that promises to cure arthritis inflammation flare-ups after only 3 weeks since initially taking the medication! Naturally, we wish to see the clinical trial data, and after months of asking for the data they have finally provided us with a CSV spreadsheet containing the clinical trial data.
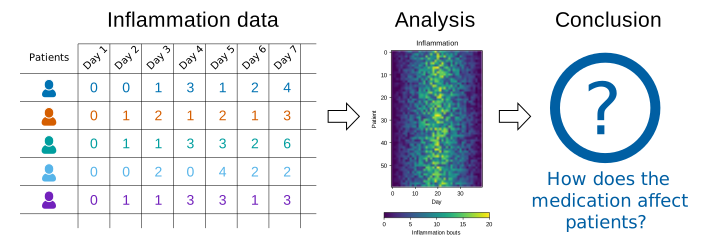
The CSV file contains the number of inflammation flare-ups per day for the 60 patients in the initial clinical trial, with the trial lasting 40 days. Each row corresponds to a patient, and each column corresponds to a day in the trial. Once a patient has their first inflammation flare-up they take the medication and wait a few weeks for it to take effect and reduce flare-ups.
To see how effective the treatment is we would like to:
- Calculate the average inflammation per day across all patients.
- Plot the result to discuss and share with colleagues.
Data Format
The data sets are stored in comma-separated values (CSV) format:
- each row holds information for a single patient,
- columns represent successive days.
The first three rows of our first file look like this:
0,0,1,3,1,2,4,7,8,3,3,3,10,5,7,4,7,7,12,18,6,13,11,11,7,7,4,6,8,8,4,4,5,7,3,4,2,3,0,0
0,1,2,1,2,1,3,2,2,6,10,11,5,9,4,4,7,16,8,6,18,4,12,5,12,7,11,5,11,3,3,5,4,4,5,5,1,1,0,1
0,1,1,3,3,2,6,2,5,9,5,7,4,5,4,15,5,11,9,10,19,14,12,17,7,12,11,7,4,2,10,5,4,2,2,3,2,2,1,1
Each number represents the number of inflammation bouts that a particular patient experienced on a given day.
For example, value “6” at row 3 column 7 of the data set above means that the third patient was experiencing inflammation six times on the seventh day of the clinical study.
In order to analyze this data and report to our colleagues, we’ll have to learn a little bit about programming.
Prerequisites
You need to understand the concepts of files and directories and how to start a Python interpreter before tackling this lesson. This lesson sometimes references Jupyter Notebook although you can use any Python interpreter mentioned in the Setup.
The commands in this lesson pertain to any officially supported Python version. Newer versions usually have better error printouts, so using newer Python versions is recommend if possible.
Getting Started
To get started, follow the directions on the Setup page to download data and install a Python interpreter.
| Setup Instructions | Download files required for the lesson | |
| Duration: 00h 00m | 1. Choosing Your First Conventional ML Baseline |
What counts as a sensible baseline or comparison model? Which conventional models belong in my starter model basket? |
| Duration: 01h 05m | 2. Building and Improving a Baseline Model |
What is the minimum process needed to build a baseline model
well? How do training, validation, test splitting, and cross-validation fit into that process? How do early results help you decide on a sensible next development step? :::::::::::::::::::::::::::::::::::::::::::::::::: |
| Duration: 02h 05m | 3. Checking What Your Model Learned |
Which metric should I choose before training a model? How do I tell whether a model is useful, overfit, or misleading? How do I evaluate results responsibly and communicate them clearly? :::::::::::::::::::::::::::::::::::::::::::::::::: |
| Duration: 03h 25m | 4. Feature Engineering for Real Problems |
What is feature engineering and why does it matter? How do features differ across tabular, text, image, time-series, and spectral problems? What simple task-specific features can I try before training a more complex model? :::::::::::::::::::::::::::::::::::::::::::::::::: |
| Duration: 04h 20m | 5. The Ethics of machine learning learning |
What is machine learning and what benefits does it present? How do I select an appropriate model for my data? What are the difference between supervised and unsupervised models? What are difference between traditional and deep learning machine learning? ::: |
| Duration: 06h 04m | 6. Feature Learning and Transfer Learning |
What does it mean for a model to learn features automatically? When is transfer learning more realistic than training from scratch? How should representation and data type guide the next modelling step? :::::::::::::::::::::::::::::::::::::::::::::::::: |
| Duration: 06h 54m | 7. Neural Networks and Deep Learning |
Why might traditional feature engineering fail on complex data? What mathematical operations define a single neuron? What happens if we remove the activation function? Why can’t a single perceptron solve all classification problems? How do multiple layers improve model capability? :::::::::::::::::::::::::::::::::::::::::::::::::: |
| Duration: 07h 44m | 8. Convolutional Neural Networks |
Why are CNNs better suited for images than standard neural
networks? What is a convolutional filter and how does it work? What is a feature map and what does it represent? Why is weight sharing important in CNNs? How do early and deeper layers differ in what they learn? |
| Duration: 08h 49m | 9. Transformers |
What roles do Query, Key, and Value play in attention? Why is multi-head attention more powerful than single-head? How do residual connections improve deep models? How do Vision Transformers differ from CNNs? Why is self-attention considered the “core innovation” of transformers? |
| Duration: 09h 54m | 10. Large Language Models |
What does a language model actually predict? Why is tokenization necessary for LLMs? How does a decoder-only transformer generate text? What role does self-attention play in LLMs? Why are LLMs considered “large”? |
| Duration: 10h 59m | Finish |
The actual schedule may vary slightly depending on the topics and exercises chosen by the instructor.
Overview
This lesson is designed to be run on a personal computer. All of the software and data used in this lesson are freely available online, and instructions on how to obtain them are provided below.
Environment file for this set of lesions
- Download aaib26.yaml
Install Python
In this lesson, we will be using Python 3 with some of its most
popular scientific libraries. One can install a plain-vanilla Python and
all required libraries by hand. If you’ve followed the Carpentry
workshop installation instructions you will have installed miniforge
and the required libraries in an environment called
carpentries. Before starting you’ll want to type
conda activate carpentries in order to activate that
environment.
Obtain lesson materials
- Download python-novice-inflammation-data.zip, python-novice-inflammation-code.zip, iris.csv and additional_stuff.zip.
- Create a folder called
swc-pythonon your Desktop. - Move downloaded files to
swc-python. - Unzip the files.
You should see three folders called data,
code, and additional stuff in the swc-python
directory on your Desktop. You should also see the iris dataset in that
folder.
Launch Python interface
To start working with Python, we need to launch a program that will interpret and execute our Python commands. Below we list several options. If you don’t have a preference, proceed with the top option in the list that is available on your machine. Otherwise, you may use any interface you like.
Option A: Jupyter Notebook
A Jupyter Notebook provides a browser-based interface for working with Python. You can launch a notebook from the command line:
1. Navigate to the data directory:
If you’re using a Unix shell application, such as Terminal app in macOS, Console or Terminal in Linux, or Git Bash on Windows, execute the following command:
On Windows, you can use its native Command Prompt program. The
easiest way to start it up is pressing Windows Logo
Key+R, entering cmd, and hitting
Return. In the Command Prompt, use the following command to
navigate to the data folder:
cd /D %userprofile%\Desktop\swc-python\data2. Start Jupyter server
python -m notebook3. Launch the notebook by clicking on the “New” button on the right
and selecting “Python 3” from the drop-down menu: 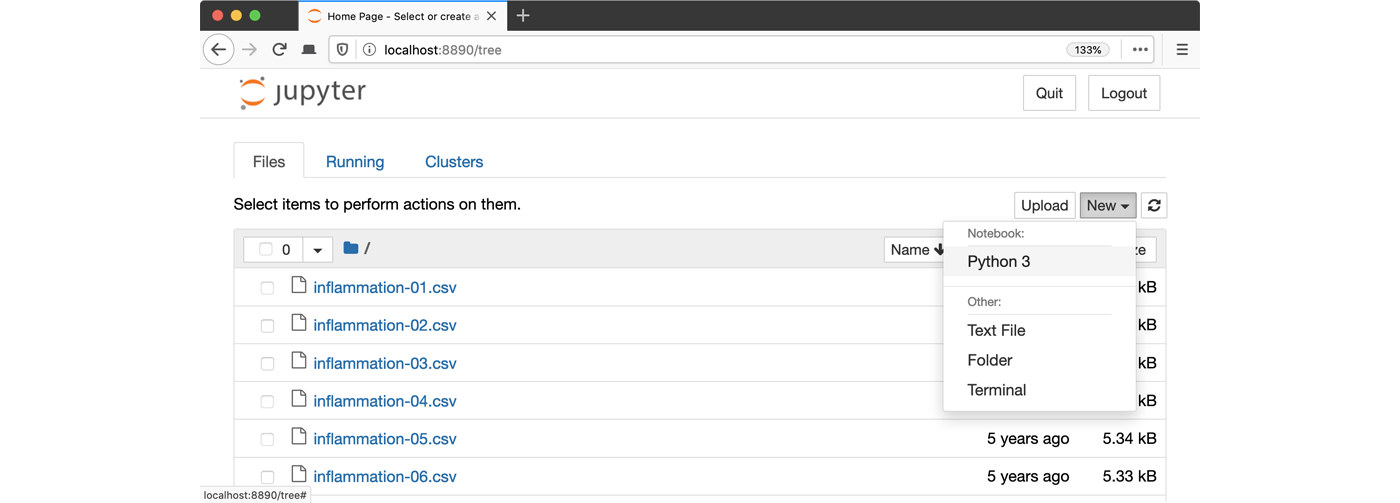
Option B: IPython interpreter
IPython is an alternative solution situated somewhere in between the plain-vanilla Python interpreter and Jupyter Notebook. It provides an interactive command-line based interpreter with various convenience features and commands. You can install IPython on your system system.
To start using IPython, execute:
ipython
Option C: plain-vanilla Python interpreter
To launch a plain-vanilla Python interpreter, execute:
pythonIf you are using Git Bash on
Windows, you have to call Python via
winpty:
winpty pythonYour anaconda environment
What is an python environment
A Python environment (often called a virtual environment) is an isolated workspace where you can install and manage Python packages independently from other projects.
Think of it like this:
Imagine each project you work on has its own “bubble”:
- It has its own Python version
- Its own libraries (packages)
- Its own dependencies
This prevents conflicts between projects.
Why Python environments are important
Without environments:
- One project might need pandas version 1.5
- Another might need pandas version 2.0
- These would clash and break things
With environments:
- Each project gets exactly what it needs
Activate a Conda environment
As part of the installation, you should already have installed Miniforge. On Windows, open the Miniforge Prompt. On macOS or Linux, open a terminal.
You only need to create the environment once, but you need to activate it each time you start a new session.
To activate the carpentries environment, type:
conda activate carpentriesTo check that the environment has activated correctly, you should either see that your prompt now displays the environment name or you can type:
conda info --envsThe active environment will have a * next to it.
Install packages with Conda
Most of the packages you need should already be installed in the
carpentries environment. Here, we will see how to install
packages using Conda in Miniforge or the terminal. Later, we will also
see examples of how to install packages from within Jupyter
Notebook.
conda install numpyAnother option if conda is problematic is to use, then you can install packages via pip
pip install numpyMake sure that, when you run these commands, you are in the correct environment (carpentries).
Safe guarding “base”
In Anaconda, the default environment is called “base.” It serves as the core foundation for everything within Anaconda. If this environment becomes corrupted or broken, you may lose the ability to create or install new environments. For this reason, it’s recommended that you only use the base environment to create new environments or update Conda, and avoid making other changes to it.
Jupyter Notebook
What is Jupyter Notebook?
Jupyter Notebook is an interactive tool that lets you write and run code in small sections, while also adding notes, explanations, and visual outputs, all in one place.
It’s widely used in:
- Data science
- Machine learning
- Research and education
Think of it as a combination of a coding environment and a document.
Understanding Cells
A notebook is made up of cells, which are the building blocks of your work.
Types of cells: * Code cells → where you write and run Python code * Markdown cells → where you write text, explanations, or instructions
Using Jupyter Notebook
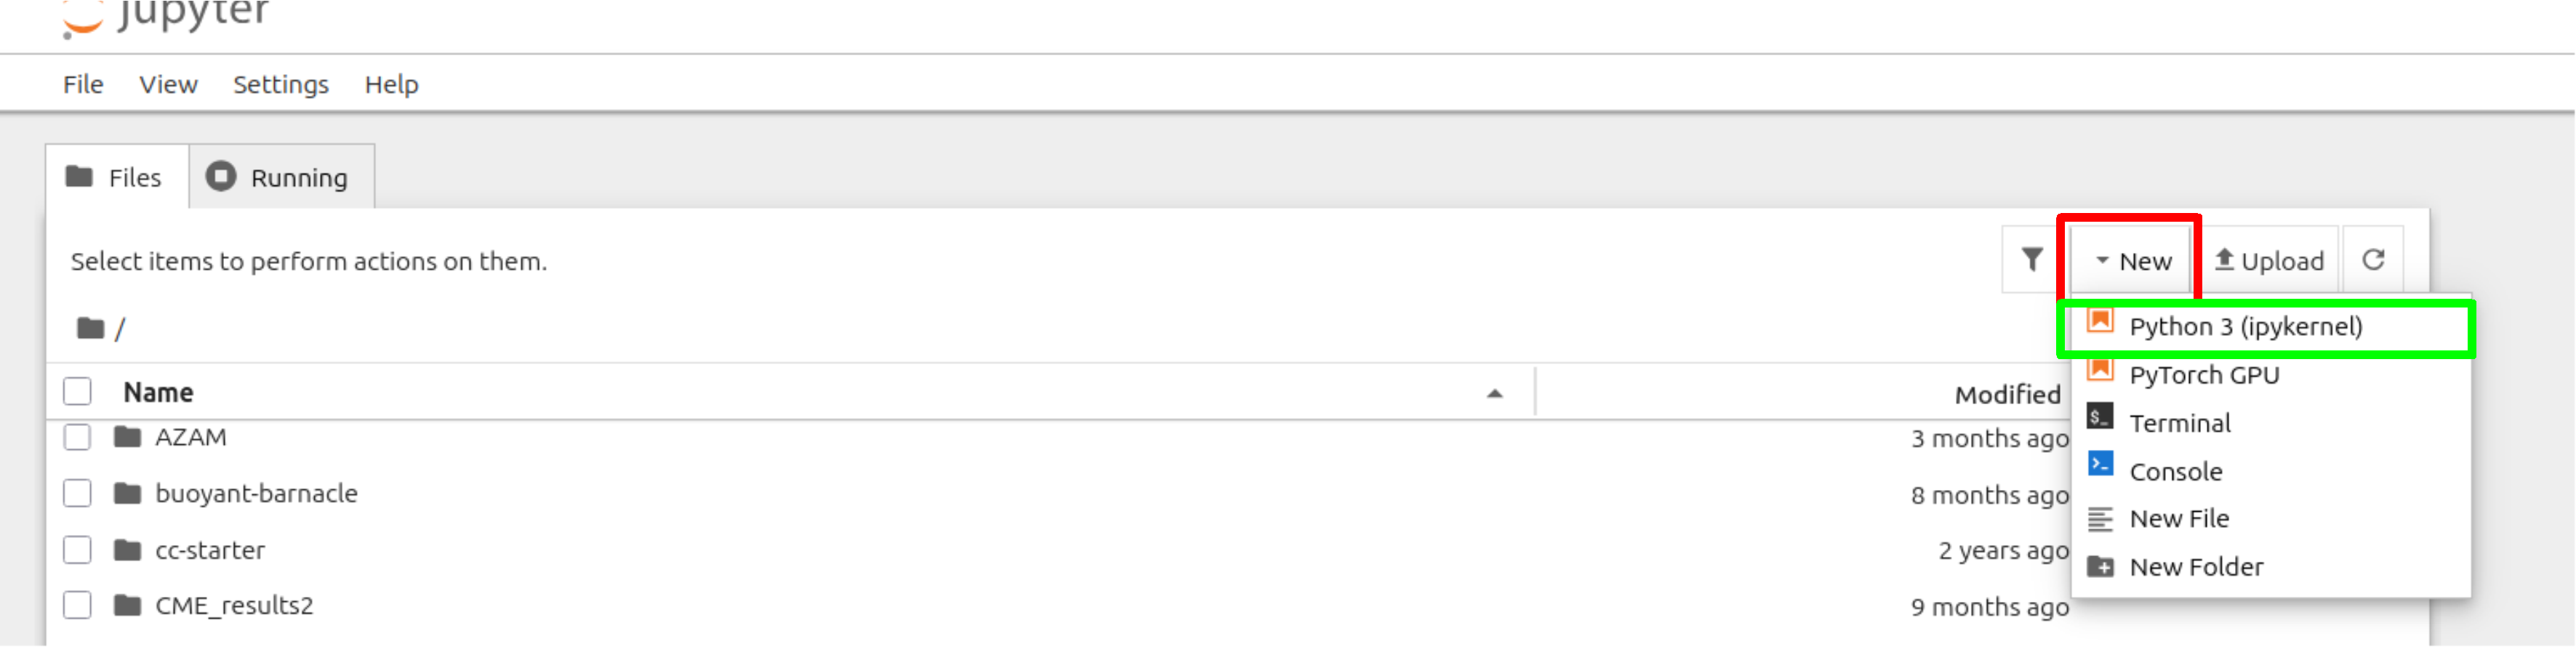
Click the red box to create a new notebook and then select python 3 (ipykernel)
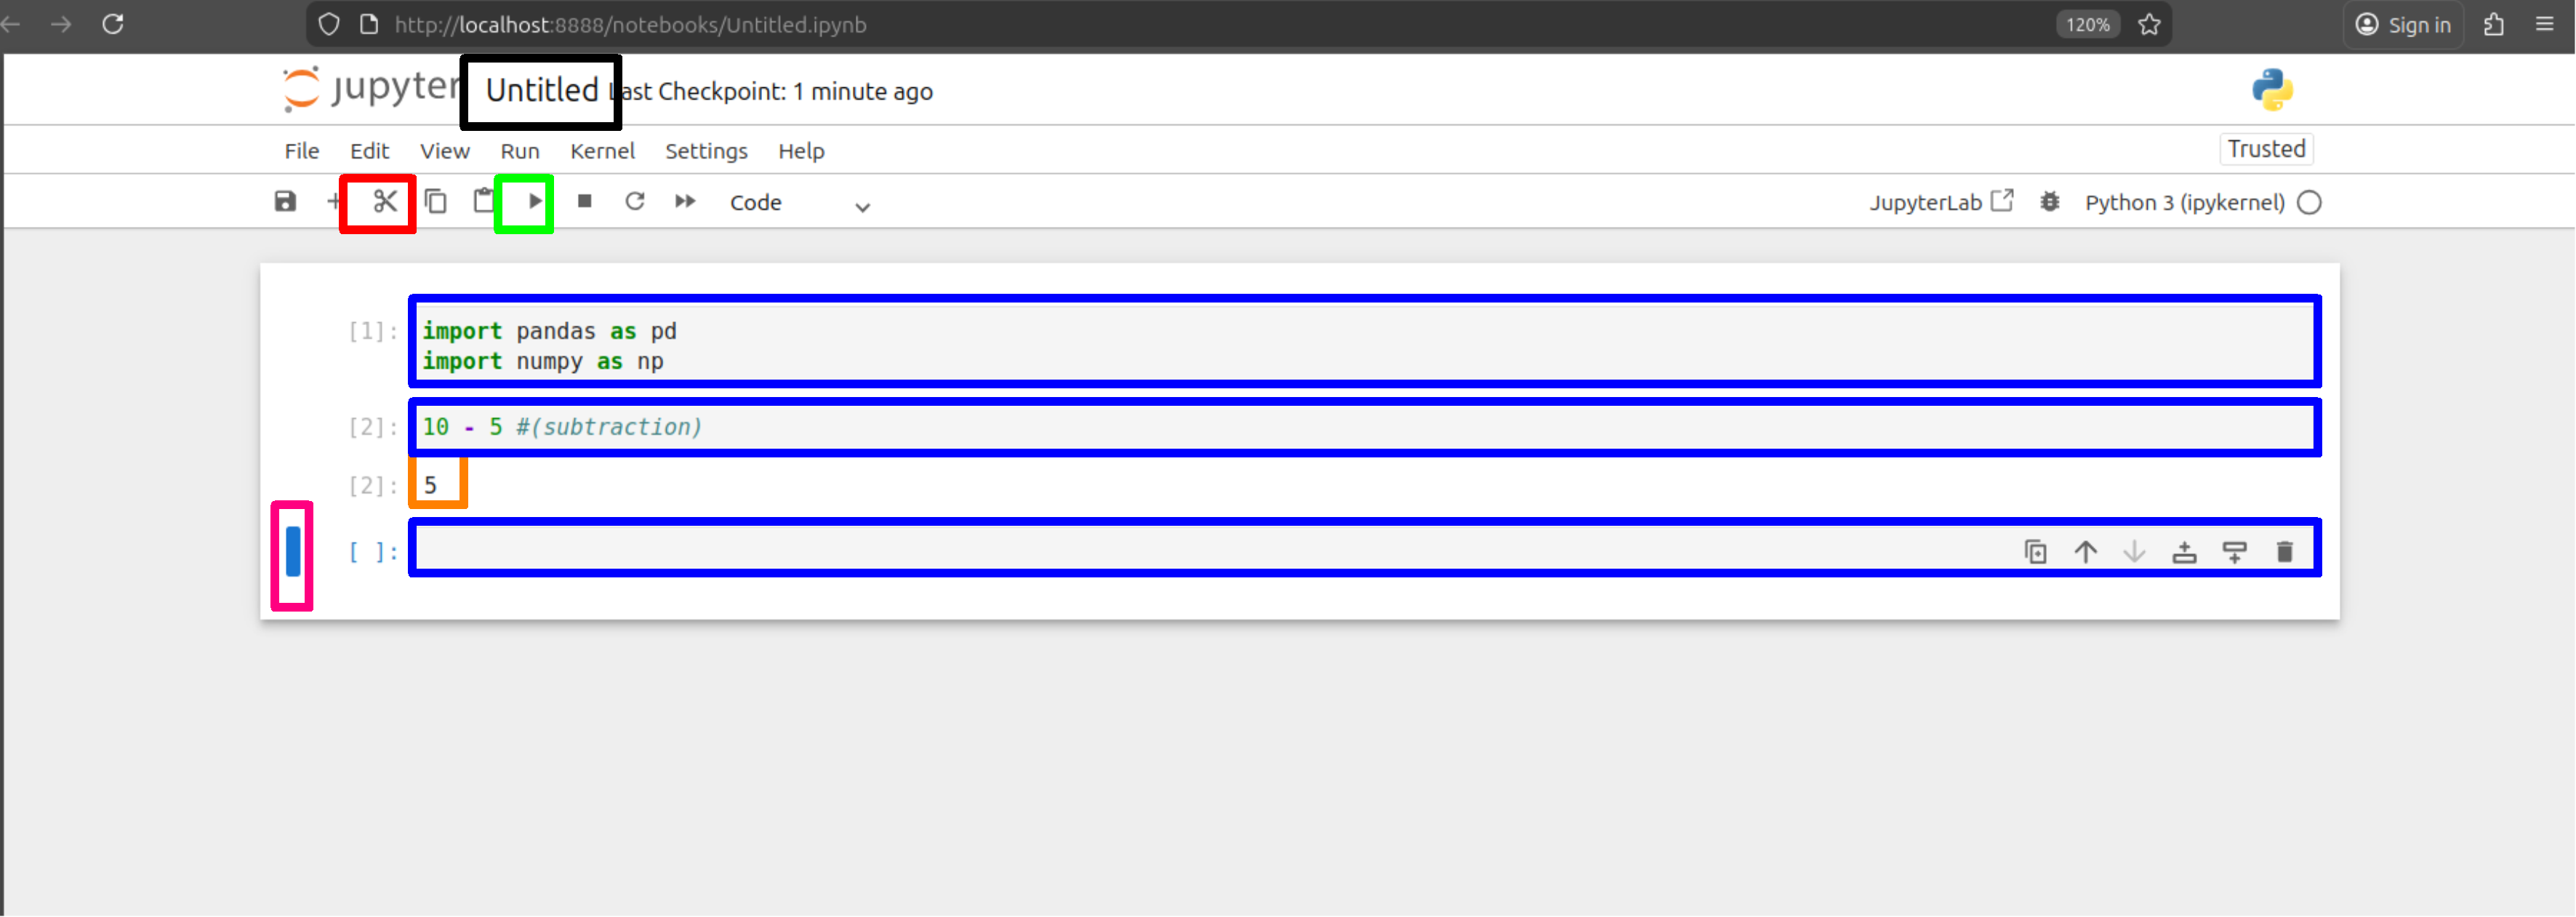
Blue: the cells where you run code, Orange: is the output from a cell above, Pink: is the current cell selected, Red: remove selected cell, Green: Run select cell and Black: Name of worksheet, change by clicking it.
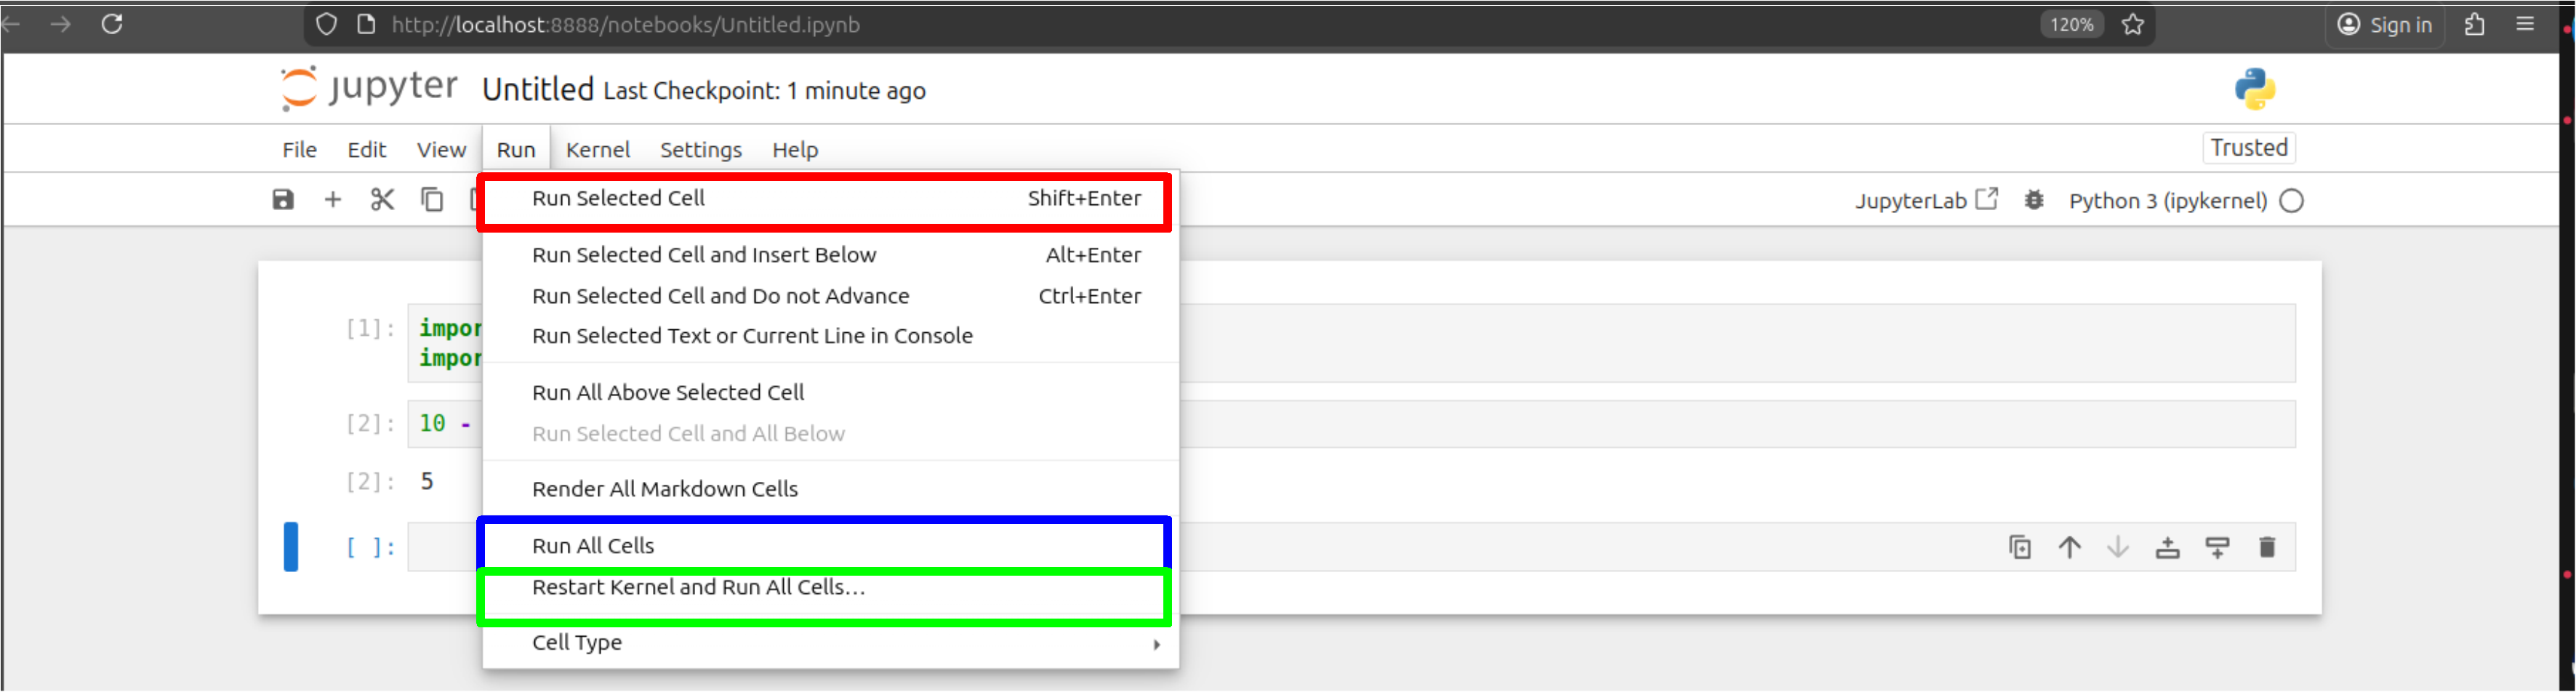
Red: run selected cell, Blue: run all if needing to check of errors and Green is to start and run cells with a blank canvas.
Why Use Notebooks Instead of Terminal or IDE?
Jupyter Notebooks are used as a starting point because they are:
- Beginner-friendly
- No need to manage multiple files
- Immediate feedback when running code
- Interactive, run small pieces of code step-by-step
- Experiment or test small sections of code
- Visual Outputs, charts, and explanations appear together
- Great for learning
- You can mix code + commenting + results in one place